Bank: System Network Design Implementation and Configuration
In today’s post, I’m sharing my recent lab experience, where I designed and implemented a network infrastructure for a fictitious banking organization. Inspired by a similar project for a company expanding internationally, I adapted this setup to meet the specific needs of a four-building bank system with 12 departments.
This project is structured into various stages, covering essential network design principles and configurations. For the first three steps, I’ll include an image of the final result instead of going through each individual command. These initial steps involve:
• Creating a network topology using Cisco Packet Tracer
• Implementing a Hierarchical Network Design
• Connecting Networking Devices with Correct Cabling


After that, the configuration steps include:
• Configuring Basic Device Settings
• Creating VLANs and assigning VLAN numbers to ports
• Subnetting and IP Addressing
• Configuring Inter-VLAN Routing on multilayer switches (Switch Virtual Interface)
• Setting up a Dedicated DHCP Server for dynamic IP allocation
• Configuring SSH for secure remote access
• Setting up OSPF as the routing protocol
• Enabling Port-Security on switches to enhance security
• Configuring a WLAN (Cisco Access Point) for wireless network access
• Host Device Configurations for end devices
• Testing and Verifying Network Communication to ensure everything operates as expected
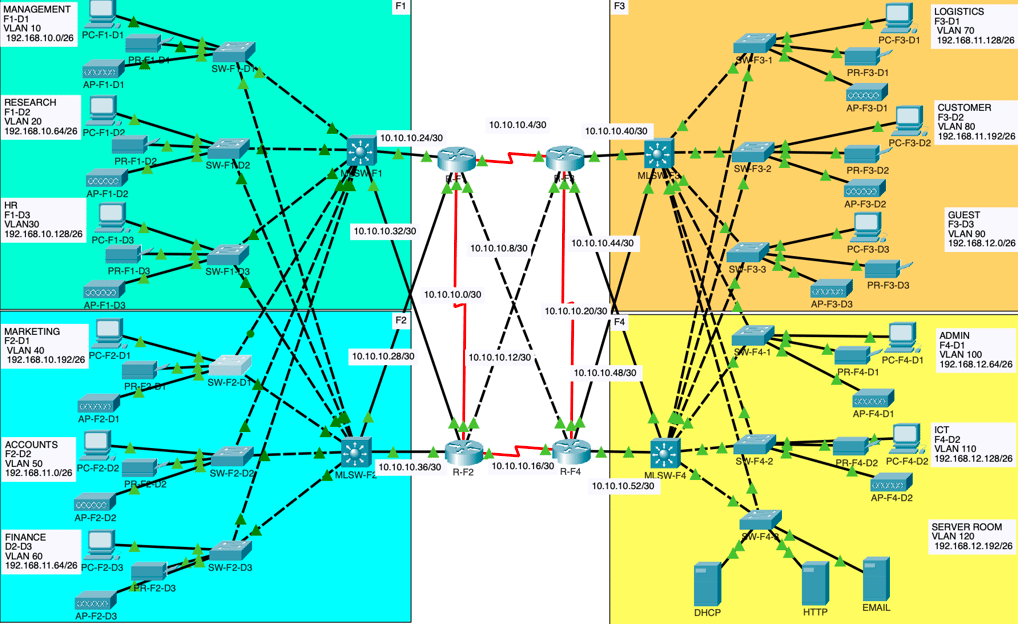
Network Overview
The bank network is structured with:
• 12 Departments spread across 4 Buildings: Departments are named F1-D1, F1-D2, F1-D3, F2-D1, F2-D2, F2-D3, F3-D1, F3-D2, F3-D3, F4-D1, F4-D2, and F4-D3.
• Switch Setup: Each department has a dedicated switch. For redundancy:
• F1 and F2 switches are interconnected to distribution switches, providing a resilient network topology.
• F3 and F4 follow the same setup, ensuring each switch is connected to a distribution layer for added fault tolerance.
• Distribution Layer: The distribution layer connects all departmental switches to 4 Routers for routing between VLANs and external networks.
Lab Configurations and Steps
Here’s a step-by-step breakdown of the configurations implemented in this lab:
1. Basic Device Configuration
Each device (routers and switches) was configured with basic settings for security and identification:
• Hostname, console password, and VTY (Telnet/SSH) configurations
• Message of the Day (MOTD) Banner for device identification
• SSH Configuration for secure remote access (explicitly enabled here)
Here’s the setup for enabling SSH on the devices with the username and password configured as ccna:
# Example of basic configuration and enabling SSH
enable
configure terminal
hostname R-F4
banner motd #This is R-F4
line console 0
password ccna
login
exit
line vty 0 15
password ccna
login
transport input ssh
exit
no ip domain-lookup
enable secret ccna
ip domain-name ccna
username ccna password ccna
crypto key generate rsa
1024
This configuration:
• Sets the hostname to identify the device as R-F4
• Creates a banner message displayed upon login
• Sets console and VTY passwords to ccna
• Enables SSH on the VTY lines with transport input ssh
• Configures the SSH domain and user credentials (ccna as both username and password)
• Generates a 1024-bit RSA key for SSH encryption
2. VLAN Creation and Port Assignment
Each department was assigned a unique VLAN to segregate traffic and increase network security.
Example of VLAN setup on SW-F1-D1:
interface range fa0/1-2
switchport mode trunk
interface range fa0/3-24
switchport mode access
switchport access vlan 10
3. IP Addressing and Subnetting
I used 192.168.10.0 as the base network and created subnets to support the IP requirements of each department. Each VLAN has its unique IP address range, helping in organized traffic segmentation.
4. Inter-VLAN Routing
Using Switch Virtual Interfaces (SVI) on multilayer switches, I configured inter-VLAN routing, allowing communication between VLANs.
# Example of Inter-VLAN Routing on multilayer switch
int vlan 10
no shutdown
ip address 192.168.10.1 255.255.255.192
ip helper-address 192.168.12.196
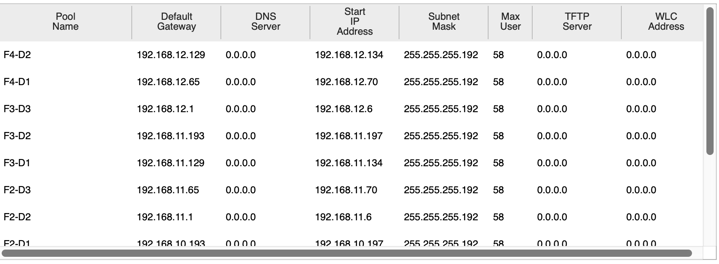
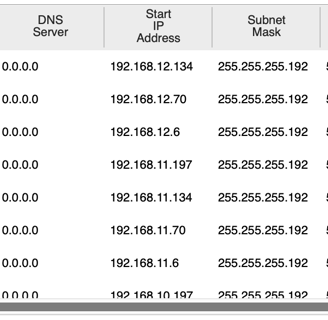
5. DHCP Configuration
A dedicated DHCP server was set up to dynamically allocate IP addresses within each VLAN. This configuration ensures that devices across the network can obtain IPs automatically, simplifying network management.
6. Security Configurations
Security is crucial in any network environment, especially for a bank. I implemented:
• Port Security with sticky MAC addressing to secure ports and limit unauthorized device connections.
Example of port security on a switch port:
# Example of port security on switch port
SW-F1-D1(config)# interface fa0/3
SW-F1-D1(config-if)# switchport port-security
SW-F1-D1(config-if)# switchport port-security maximum 2
SW-F1-D1(config-if)# switchport port-security violation restrict
SW-F1-D1(config-if)# switchport port-security mac-address sticky
• Configured SSH on all routers for secure remote login (as shown above).
7. RIPv2 Routing Protocol Configuration
To facilitate dynamic routing, I used RIPv2 as the routing protocol. This protocol allows efficient route advertisement and reduces network latency.
Example of RIPv2 configuration:
# Example of RIPv2 configuration on router
R-F3(config)# router rip
R-F3(config-router)# version 2
R-F3(config-router)# network 10.10.10.12
R-F3(config-router)# network 10.10.10.40
R-F3(config-router)# network 10.10.10.20
R-F3(config-router)# network 10.10.10.44
R-F3(config-router)# network 10.10.10.4
8. Wireless Network (WLAN) Configuration
Each department includes a wireless network using Cisco Access Points, allowing both wired and wireless users seamless access to the bank’s network.
9. End Device Configurations
All end devices, including PCs and printers in each department, were configured to obtain IP addresses dynamically from the DHCP server.
10. Testing and Verification
Finally, thorough testing was conducted to verify:
• Connectivity between devices across VLANs
• DHCP lease allocation for dynamic IP addresses
• Secure access using SSH for remote device management
Conclusion
This project provided an opportunity to implement a hierarchical network design suitable for a bank, ensuring scalability, security, and efficient traffic management. By leveraging VLAN segmentation, inter-VLAN routing, RIPv2 for dynamic routing, secure SSH access, and port security, this design supports both the current and future networking needs of the organization.
This configuration approach aligns closely with modern network standards for institutions needing secure, scalable infrastructures. It’s an excellent example of how to design networks that are both robust and adaptable